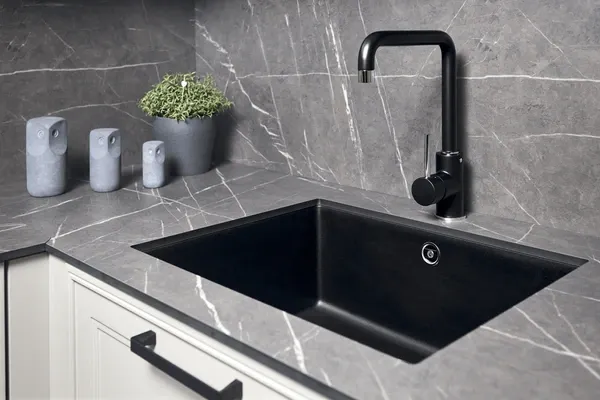
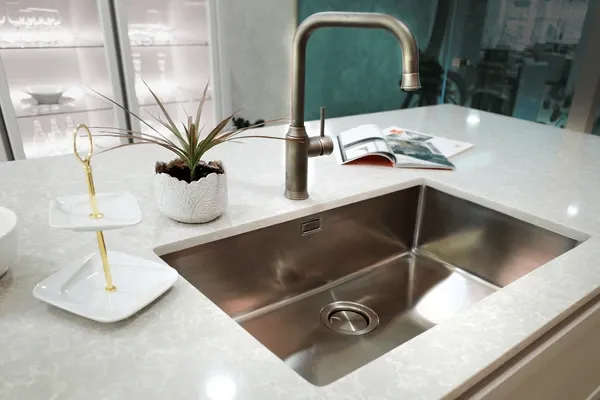
If you’ve ever looked at a countertop and thought, wow, the sink just seems to disappear, that’s exactly what an undermount sink does. It sits under the counter, smooth and seamless, making everything look clean and effortless.
But here’s the part most people overlook, getting the right undermount sink dimensions and following proper installation standards can make or break the result. In Canadian homes, every kitchen and bathroom is a little different, countertops, cabinets, plumbing, all of it. That means the small details really matter.
What Makes an Undermount Sink Different
Here’s why the undermount sink gets so much attention. Picture this: a regular drop-in sink just sits on top of your counter with that rim you always have to wipe around. Now, an undermount? It’s tucked right underneath. The counter just flows straight into the sink. No edges, no crumbs, no hassle, just a clean surface that makes your kitchen or bathroom look instantly sharper.
That single design choice changes the whole experience. You can wipe spills straight into the sink, no buildup, no grime around the edge. And the best part is it just makes the whole space feel open and easy on the eyes.
Now, think about an undermount sink vs a drop-in sink, really, it comes down to three things: how it looks, how easy it is to clean, and how much hassle it is to put in. Drop-ins? Yeah, they’re a bit simpler and cheaper. But an undermount? That smooth, built-in look instantly makes your kitchen or bathroom feel way more polished and modern.
Why It’s a Popular Choice in Canadian Homes
Step into a new kitchen and chances are you’ll spot an undermount sink tucked under quartz or granite. The style just works. It pairs beautifully with stone, composite, or solid-surface counters, all of which are common in Canadian homes.
The look isn’t just about appearance, though. It’s practical. Winter months mean more cooking at home, more dishwashing, and more cleaning and that’s where the smooth, easy-to-wipe surface really pays off.
In bathrooms, the same story plays out. A bathroom vanity undermount sink keeps everything clean and simple. Water can’t slip under a rim or stain the counter edges. That clean fit helps keep moisture out and surfaces durable for years.
Choosing the Right Undermount Sink Size
Here’s the thing about undermount sink dimensions, they can’t just “look right.” Let’s go over some general size guidelines that fit most Canadian homes:
| Sink Type | Standard Width | Depth | Ideal Cabinet Width |
| Single Bowl Kitchen Sink | 24″–30″ | 8″–10″ | 30″–33″ |
| Double Kitchen Sink | 32″–36″ | 8″–10″ | 36″–39″ |
| Small Stainless Sink | 15″–20″ | 6″–8″ | 21″–24″ |
| Bathroom Vanity Undermount Sink | 16″–22″ | 5″–8″ | 24″ or larger |
If your base cabinet is the standard 36 inches, a double kitchen sink usually works best. But in tighter spaces, think apartments or basement kitchens like a small stainless sink or a single bowl often makes more sense and keeps everything feeling roomy.
The goal is to balance counter space and functionality. Too big, and you’ll lose prep area. Too small, and washing large pots becomes a struggle.
Standard Kitchen Sink Dimensions in Canada
In Canadian kitchens, the usual sink sizes are about 22 by 30 inches for a single bowl and 33 by 22 inches for a double. Those numbers aren’t random, they fit the standard cabinets and countertops most homes have had since around 2000.
If you’ve got a dishwasher in the mix, you can go a little smaller. And if you love cooking, baking, or hosting, a double sink makes life a lot easier. For tighter kitchens, a small stainless sink is a real winner, it’s practical, looks good, and cleans up easily.
Installation Standards for Canadian Homes
Installing an undermount sink isn’t just about plopping it in place. You’ve got to get the mounting, sealing, and alignment right, otherwise, you’re asking for leaks, sagging, or even cracks in your countertop.
Here in Canada, it’s best to follow the CSA B45.0/B45.4 plumbing standards to make sure everything is safe, strong, and built to last. That ensures your setup can handle water load, temperature changes, and pressure safely.
A good installation usually includes:
- Heavy-duty mounting clips or brackets for support
- High-quality undermount sink adhesive or waterproof sealant
- Reinforced countertop backing for heavier sinks
- Properly polished edges to prevent chipping or stress cracks
It’s worth checking that your countertop installer has experience with undermounts.
Step-by-Step: How to Install an Undermount Sink
A proper under the counter sink installation happens in a few stages. Here’s the general process professionals use:
- Start by marking and measuring with your sink’s template so you know exactly where it’s going to sit.
- Next, cut the opening in your countertop carefully, it needs to fit just right.
- Slide the sink underneath and check that it’s centered. Even a tiny shift can make it look off or cause problems later.
- Spread the undermount sink adhesive all around the edges so it sticks really well.
- Clamp it from underneath with brackets or support beams, this keeps it in place while the adhesive sets.
- Then, give it a full 24 hours to cure before you hook up the plumbing.
- After that, seal the edges and test for leaks to make sure everything’s watertight.
And here’s a tip: if your countertop is quartz or granite, don’t try to cut it yourself. Let a pro handle it. One wrong move and you’re looking at a big, expensive mistake.
How to Secure an Undermount Sink for Long-Term Strength
The most common question homeowners ask is how do you secure it so it doesn’t fall? The answer lies in both the mechanical and adhesive bonds. An undermount sink should never rely only on glue. The adhesive is there to seal and support, but the true strength comes from proper clips or metal brackets.
Here’s what makes the difference:
- Use stainless steel clips that resist corrosion
- Make sure surfaces are clean before applying any adhesive
- Use a reliable undermount sink adhesive designed for stone or solid surfaces
- Always double-check that the sink rim is flush with the underside of the counter
Once set correctly, the sink shouldn’t move even slightly when filled with water or dishes.
Picking the Right Material
Material choice changes not just how the sink looks but how it performs. In Canadian homes, there are a few standout favorites:
- Stainless steel kitchen sink for busy households.
- Black kitchen sink needs regular cleaning to prevent water spots.
- Porcelain undermount bathroom sinks are easy to keep looking new.
- A composite granite sink is ideal for heavy kitchen use.
For most kitchens, a stainless steel kitchen sink is still the best all-rounder, tough, affordable, and easy to pair with any style.
Design and Functionality Tips
Little design decisions make a big difference once the sink is in use. Here are a few tips that come from experience:
- Add over kitchen sink lighting for better visibility, it makes cooking easier.
- Keep your kitchen wash basin size balanced with your counter layout.
- Match your faucet to your sink, taller faucets for deeper bowls, shorter ones for compact setups.
- If you go with a sunken kitchen sink, make sure the slope allows proper drainage.
- For multitaskers, a double kitchen sink saves time when cooking or washing up.
Mistakes to Avoid
Even a beautiful undermount sink can become a problem if installed carelessly. Watch out for these common mistakes:
- Using poor-quality adhesive or skipping sealant
- Not supporting the sink during curing
- Misaligned faucet or drain holes
- Forgetting to seal the countertop edge properly
These small errors often lead to leaks, sagging, or damage down the line. Taking time during installation prevents those costly fixes.
Maintenance and Longevity
Once your undermount sink is in, it’s really easy to keep it looking great. Just wipe the edges regularly, keep the surface dry, and clean it with a mild detergent. Every few years, you might want to re-seal the joint between the counter and sink, just to be safe.
Depending on the material you pick, an undermount sink can easily last 15 to 20 years without any problems.
Conclusion:
In Canada, getting an undermount sink installed usually runs between $250 and $600. The price depends on the material, your countertop, and whether the plumbing needs moving. Bigger sinks and stone counters will push it toward the higher end.
It’s definitely an investment, but it’s one that’s worth it. Once you get used to wiping spills straight into the sink, you’ll wonder how you ever lived without it.
Frequently Asked Questions
How deep is a typical undermount sink?
Most are 8–10 inches deep. Big enough for all your pots, pans, and dishes.
Can you switch a drop-in for an undermount?
Yep, but heads up, you’ll probably need to cut and seal the countertop a bit.
How do you keep it from moving or leaking?
Use strong clips plus a good-quality sink adhesive. That combo keeps it snug and leak-free.
Double sink or single?
Depends on what you do in the kitchen. Double sinks are great for multitasking. Single bowls? Perfect for giant pots.
Can you put one under laminate counters?
You can, but it’s tricky. You have to seal it perfectly. Stone or solid surfaces make life easier.
Best material for long life?
Stainless steel, durable, versatile, and low-maintenance.
How do you avoid leaks?
Check the seal every now and then. Reapply adhesive or silicone if needed.
Bathroom undermount sinks, hard to keep clean?
Not really. Just wipe the rim regularly, and you’re good.
What adhesive should you use?
Waterproof, heavy-duty, made for solid surfaces. Don’t skimp here.
How long does a properly installed sink last?
15–20 years, easy. Minimal care, maximum payoff.